
Material necesario/Material needed:
- un sello/one tube
- Filtro Neu!/Sonderangebot (Plugin New/Sonderangebot)
- Filtro Efectos FFG???/Auto Elipse (Plugin FFD Effect/Auto Elipse)
- Filtro Efecto I-Decay/Radial Diffuse (Plugin Efecto I-Decay/Radial Diffuse)
1. - Abro un paño de 600 x 400, relleno con gradiente.
Open a transparent 600 x 400 new image.
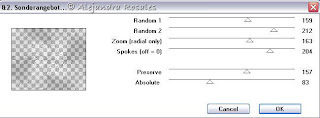
2.- Capas/Nueva capa. Filtro Neu!/Sonderangebot con los siguientes valores:
Layers/New raster layer/Plugin Neu! /Sonderangebot with following settings:
3.- Capas Fusionar/Fusionar capas visibles. Imagen rotar libre: 45 y con la herramienta de selección, selecciono el cuadro central
Layers Merge/Merge visible. Imagen free rotate: 45 and with selection tool, select el center square
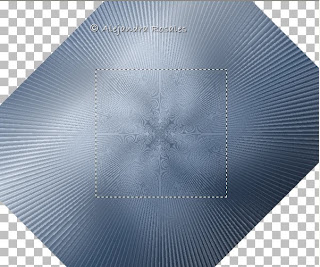
Edit/Copy como nueva imagen. En el paño anterior apretamos deshacer dos veces para volver a la posición original.
Edit/Copy as new image. In the other image we´d work previously, hit undo twice, to return to original position.
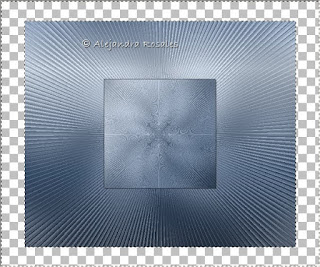
4.- Pegamos la imagen del centro que copiamos como nueva capa y aplicamos sombra:
Vertical y Horizontal: 1, Opacity: 71, Blur: 2
Paste the center image as new layer and apply shadow: V/H: 1. Opacity: 71, Blur: 2
5.- Imagen redimensionar: 85% (todas las capas destildado). Seleccionamos el borde con la varita mágica
Image resize 85% (all layers unchecked). Select the border with the magic hand
Flood fill with the original gradient.
6.- Efectos/Plugin FFG???/Auto Elipse
Plugin FFG???effects/Auto Elipse
 7.- Sin quitar la selección Efectos/Textura/persiana:
keep selected. effects/Texture/Blinds:
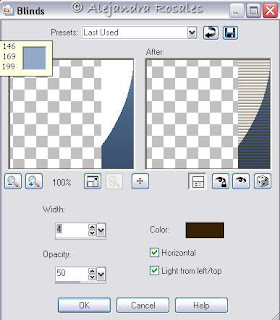
Sombra con valores positivos y negativos.
Shadow with possitive and negative values.
8.- Pego mi tube como nueva capa y duplico.
Paste the tube as new layer and suplicate.
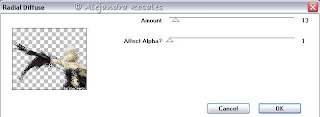
Efecto I-Decay/Radial Diffuse
Plugin I-Decay/Radial Diffuse
9.- Redimensiono el tube original 90% y acomodo. Aplico sombra.
Resize the original tube 90% place with the move tool. Apply shadow.
Pongo nombre y sombra.
Apply your text and shadow.
10.- Agrego borde simétrico 1 blanco.
Add border, symmetric 1, white color.
11.- Agrego borde simétrico de 6, seleccionar con la varita mágica y rellenar con el gradiente, aplicar biselado.
Add border: 6, select with the magic hand, fllod fill with the gradient, apply inner bevel.
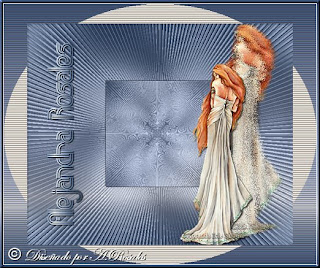
Guardo como .jpg
Save as .jpg


0 comentarios:
Publicar un comentario